Introduction
Hello everyone, I hope you all are doing great. In today’s tutorial, we are going to interface an HC-SR04 ultrasonic sensor with an ESP32 Microcontroller Board. After interfacing the sensor, we will transmit its value over Classic Bluetooth to a smartphone. To display the value on a smartphone, we will download and use a mobile app named Bluetooth Terminal. The whole working setup of this project is shown in the below figure:
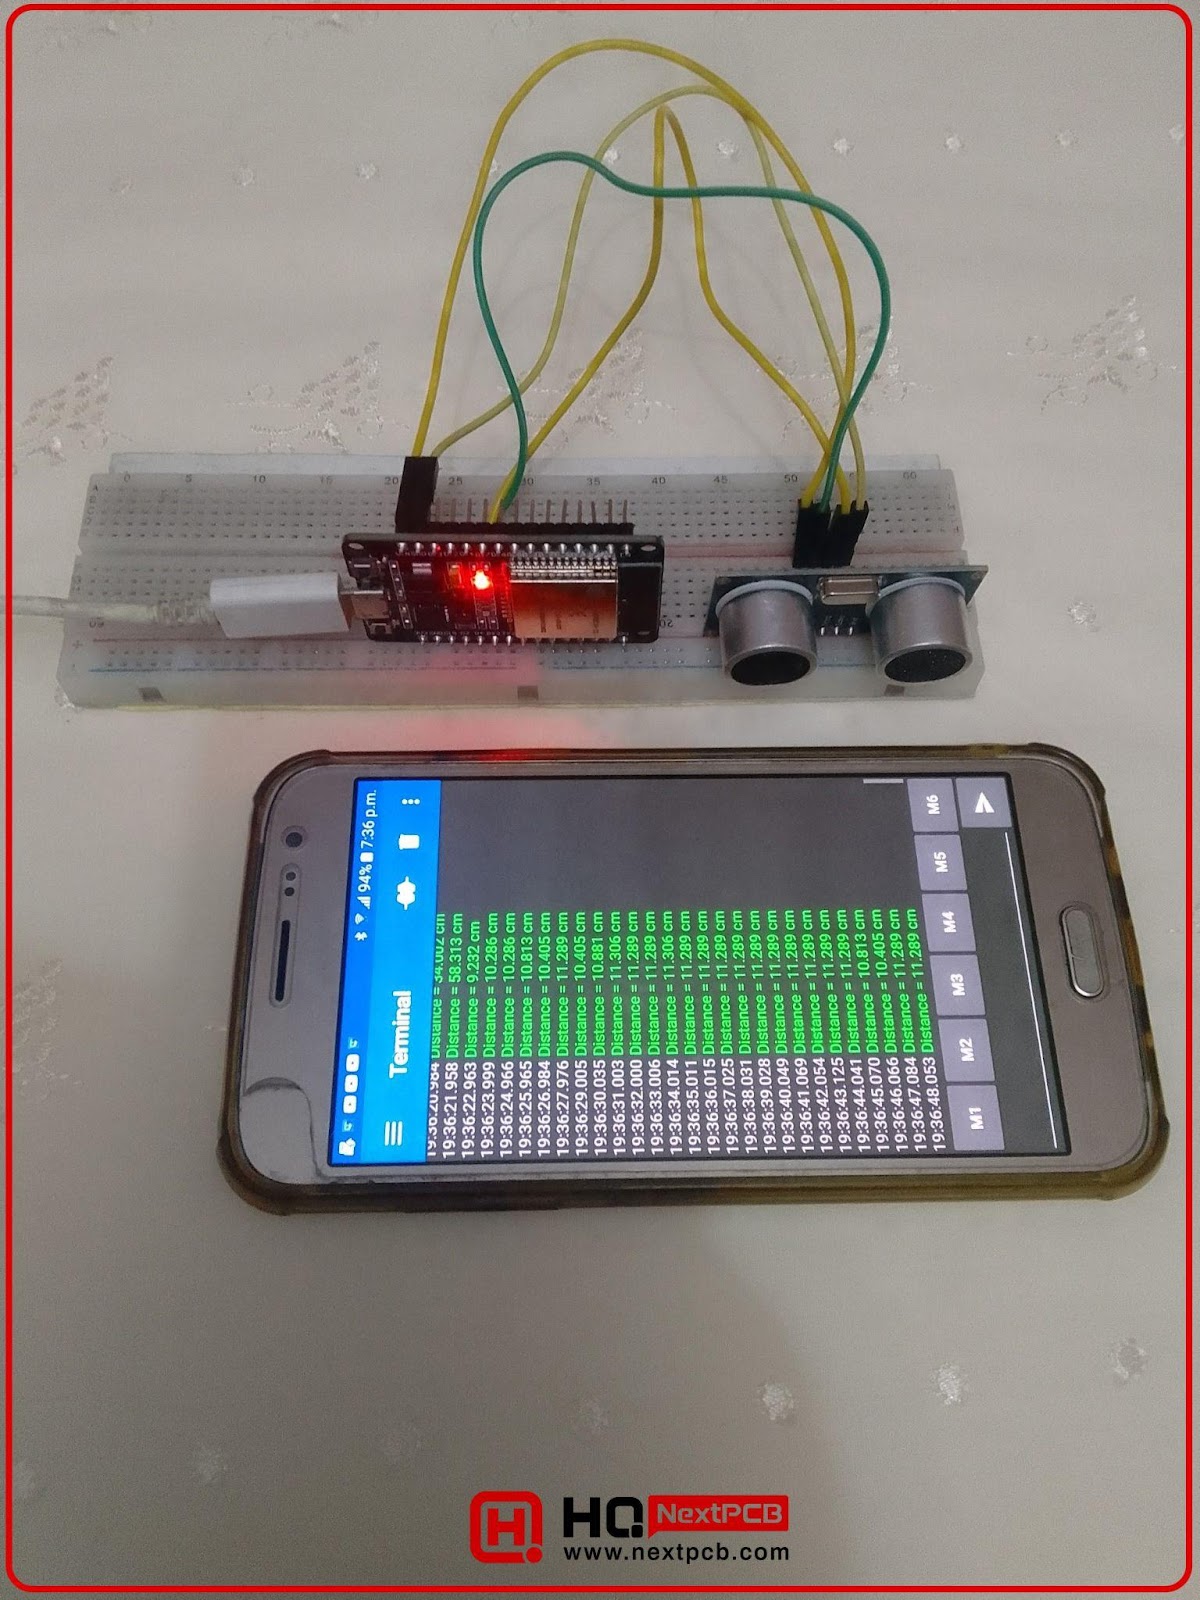
Fig: Connecting ESP32 with a mobile phone
Why are we doing this project?
We often need Bluetooth communication in our embedded projects, mostly IoT and automation projects. Earlier, we used to rely on Bluetooth modules i.e. HC-05, HC-06, etc. We had to add these modules to our microcontrollers. Combining these modules with microcontrollers often involved a lot of complicated tasks including wiring, configuration, and programming. The projects become cumbersome and time-consuming.
With the progress of advanced embedded systems, however, these challenges have been significantly mitigated. One of the most notable advancements in this field is the invention of the ESP32 microcontroller, developed by Espressif Systems. The ESP32 has brought many positive changes to the way we approach wireless communication in embedded projects. It is offering a more streamlined, efficient, and cost-effective solution. It has made the whole task of wifi and Bluetooth communication much easier.
Introduction to ESP32
ESP32 is a standalone microcontroller board. It has an integrated wifi module and dual-mode Bluetooth module. The integration of these wireless communication protocols into a single chip makes the design process simple. It reduces the need for external modules. Thus, it ultimately lowers the overall cost of projects. One of the major advantages of the ESP32 is its ability to handle complex tasks with ease. It features a dual-core processor, a set of GPIO pins, and a variety of built-in peripherals. It has touch sensors, ADCs, DACs, UART, SPI, I2C, and more. This rich feature set enables developers to create sophisticated and multifunctional IoT devices without the need for additional hardware. ESP32 has many different versions. We will use ESP32-WROOM-32 for our experiments.
Features of ESP32-WROOM-32
ESP32-WROOM-32 is a powerful, generic Wi-Fi + Bluetooth + Bluetooth LE MCU module. It is used in a wide variety of applications.
The ESP32 is an integration of Bluetooth, Bluetooth LE, and Wi-Fi. The collection of all these features ensures that a large number of tasks can be fulfilled. Using Wi-Fi allows a very long physical range. It can establish a direct connection to the Internet through a Wi-Fi router. Using Bluetooth, the user can comfortably connect to the phone or broadcast low-energy beacons for its detection.
Specifications of ESP32-WROOM-32 Bluetooth
The ESP32's Bluetooth capabilities are robust. Bluetooth Classic mode is ideal for applications that require high data rates. For example, audio streaming. Bluetooth Low Energy (BLE) is perfect for battery-powered devices that need long-term connectivity with minimal energy consumption. The flexibility to switch between these modes ensures that the ESP32 can be adapted to a wide variety of use cases, from low-latency data transmission to energy-efficient sensor networks.
ESP32-WROOM-32 supports Bluetooth v4.2 BR/EDR and Bluetooth LE specification. Its Bluetooth radio has Class-1, class-2, and class-3 transmitters. It has a NZIF receiver with –97 dBm sensitivity.
What is HC-SR04 and how does it work?
The ultrasonic sensor module that we are going to use here is an HC-SR04.

Fig:HCSR04 SONAR sensor
The ultrasonic sensor module that we’re going to use here is the HCSR04 module. It can measure the distance of the nearest object in front of it. They can detect any object within the range of 2cm - 400cm. The HCSR04 provides an accuracy of up to 3mm. The modules consist of an ultrasonic transmitter, an ultrasonic receiver, and a control circuit.
Working principle of the SONAR sensor
HCSR04 SONAR sensor can determine the distance of people or any object in front of it. After powering this sensor, a pulse of 10 microseconds should be input on the Trig pin. The module then generates a signal composed of eight small pulses. Then a pulse is generated on the ECHO pin. The distance to the closest object to the sensor is obtained by multiplying the time between the pulse input on the trigger pin and the generation of the echo on the echo pin by the wind speed.
Distance of the nearest obstacle = (high level time×velocity of sound (340M/S) / 2
Timing diagram of HC-SR04
The Timing diagram is shown below:
- The formula for calculating distance in centimeters: uS / 58 = centimeters
- The formula for calculating distance in inch: uS / 148 =inch;
- The range = high-level time * velocity (340M/S) / 2; The manufacturers suggest using a 60ms measurement cycle, to prevent colliding the trigger signal with the echo signal.

Fig: Timing diagram of HCSR04
What will we do in this experiment?
In this experiment, we will pair the ESP32 WROOM with our mobile phone. After establishing the Bluetooth communication, Will will interface ESP32 with an HCSR-04 sensor. We will see the sensor data on our mobile phones.
Necessary hardware and components

|
|
|
|
|
|
|
|
|
|
|
|
|
|
|
|
|
|
|
|
|
Necessary software
- Arduino IDE
- Serial Bluetooth terminal
Circuit diagram:

Fig: Connection between ESP32 and HCSR04
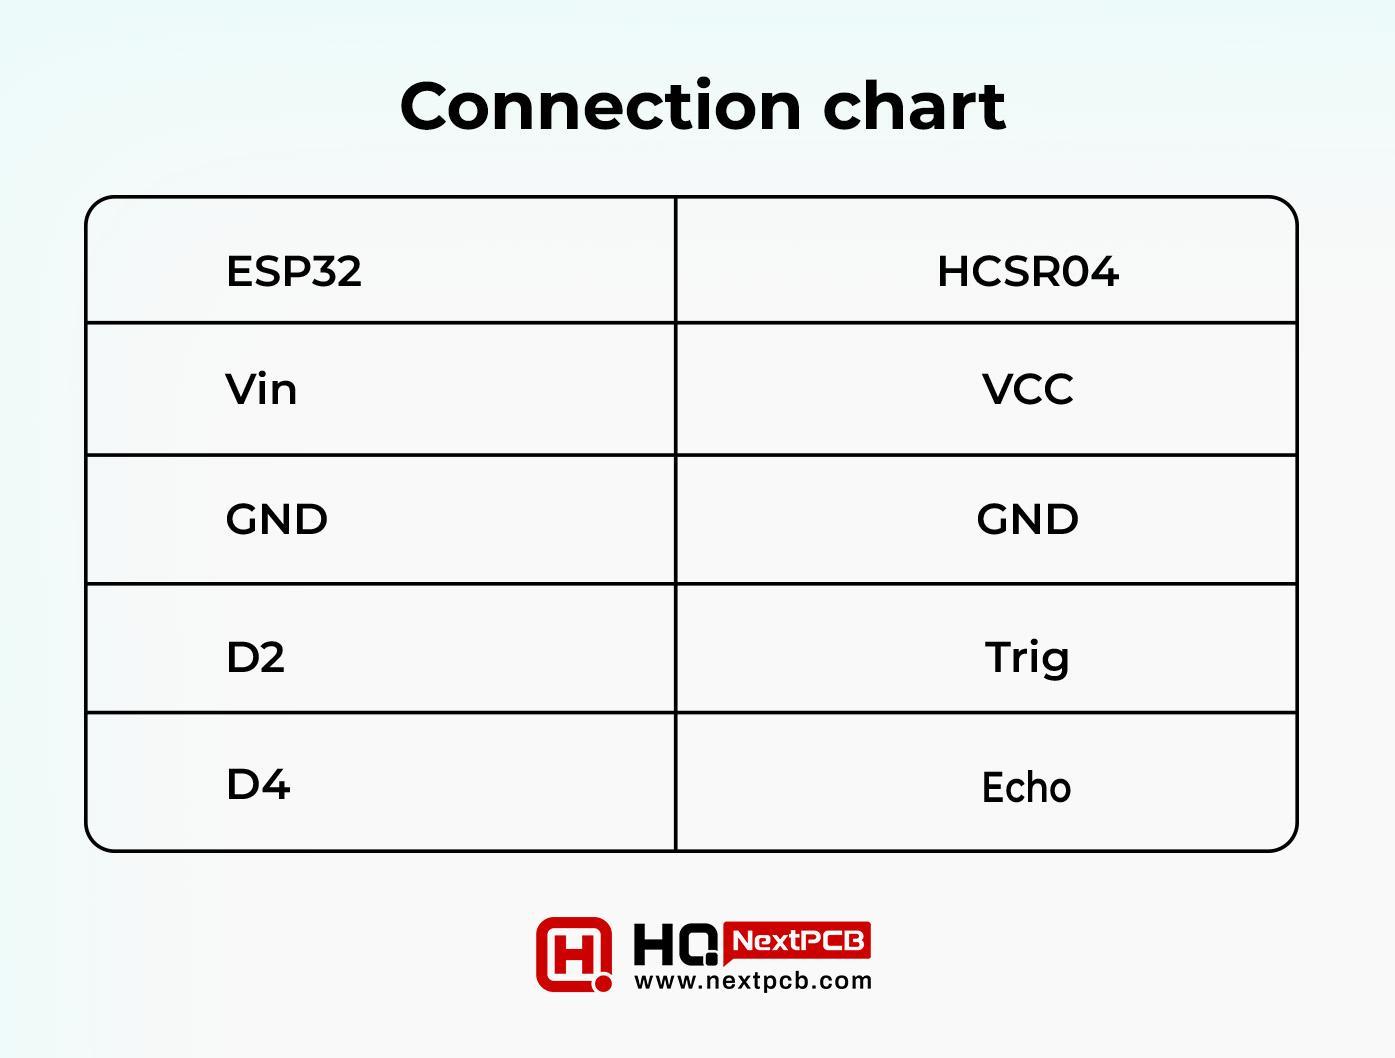
Connection chart
|
|
|
|
|
|
|
|
|
|
|
|
|
|
|
Programming

Fig:ESP32 board installation
- Press OK.
- Go to Tools>Boards>Boards Manager.
Board installation
If this is your first project with the ESP32, you need to install the board in your Arduino IDE first. This is how you have to install the ESP32 boards.
- Open the Arduino IDE
- Go to board preferences
- Copy this URL: https://images.theengineeringprojects.com/software/esp32.json
- Paste it in the shown direction. If you installed other boards(like ESP8266 or Raspberry Pi Pico) earlier in the same manner, you have to separate all the URLs by comma.
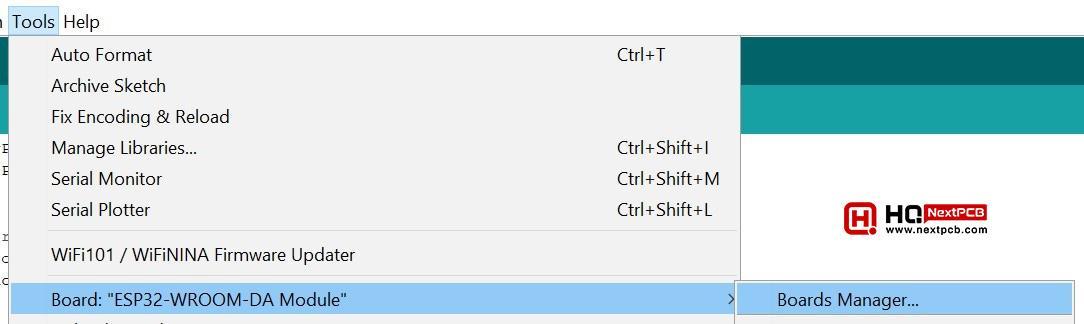
Fig:Tools> Tools>Boards>Boards manager
- Type ESP32
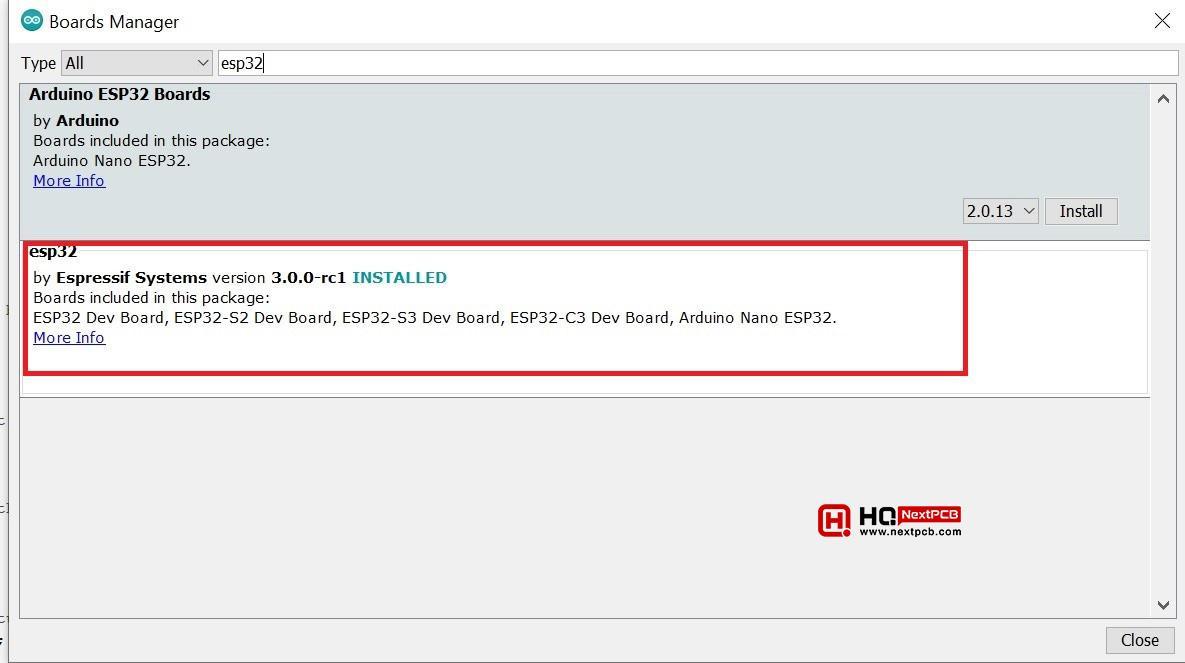
Fig:ESP32 board installation
- Select ESP32 as shown in the picture and Click install.
- Wait as long as the installation takes place. After installation, you will see the ESP32 boards in the boards list.
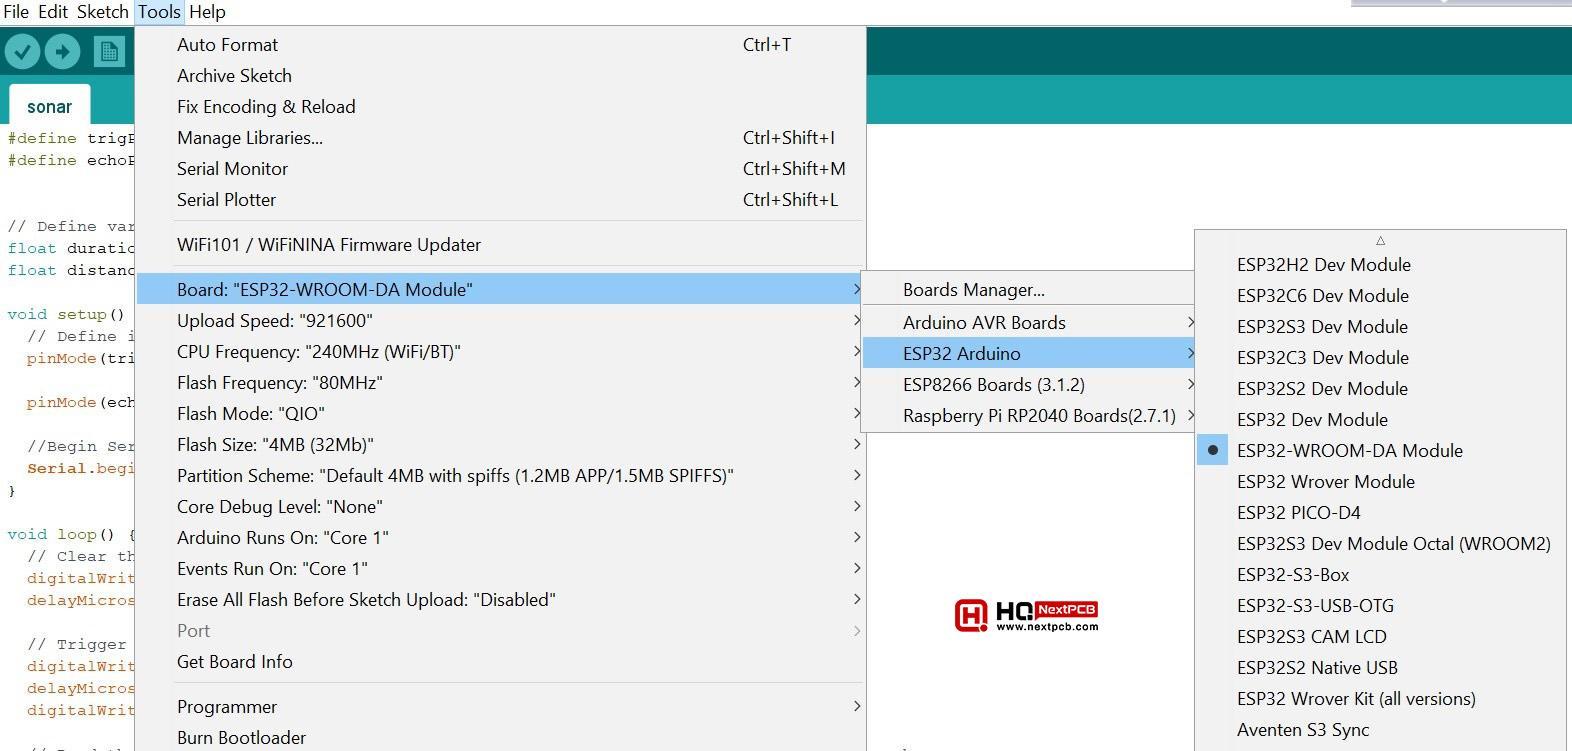
Fig:ESP32 boards list
Driver installation
If you do not have the CP210x driver installed on your computer, you have to download and install it from here:
Code:
Write the following code and compile it.
#include "BluetoothSerial.h"
#if !defined(CONFIG_BT_ENABLED) || !defined(CONFIG_BLUEDROID_ENABLED)
#error Bluetooth is not enabled!
#endif
#define trigPin 2
#define echoPin 4
// Define variables:
float duration=0.00;
float distance=0.00;
String fullString = "";
BluetoothSerial SerialBT;
void setup() {
// Define inputs and outputs:
pinMode(trigPin, OUTPUT);
pinMode(echoPin, INPUT);
//Begin Serial communication setting the baud rate at 115200:
Serial.begin(115200);
SerialBT.begin("MyESP32"); //Bluetooth device name
Serial.println("My ESP32 started, now you can pair it with a Bluetooth device!");
}
void loop() {
// Clear the trigPin by setting it LOW:
digitalWrite(trigPin, LOW);
delayMicroseconds(2);
// Trigger the sensor by setting the trigPin high for 10 microseconds:
digitalWrite(trigPin, HIGH);
delayMicroseconds(10);
digitalWrite(trigPin, LOW);
// Read the echoPin, pulseIn() returns the duration (length of the pulse) in microseconds:
duration = pulseIn(echoPin, HIGH);
// Calculate the distance:
distance = duration /58.82 ;
// Print the distance on the Serial Monitor (Ctrl+Shift+M):
// Serial.print("Distance = ");
// Serial.print(distance);
// Serial.println(" cm");
//SerialBT.write ("Distance = ");
fullString = "Distance = " + String(distance,3) + " cm " + "\r\n";
for(int i = 0; i < fullString.length(); i++)
{
SerialBT.write(fullString.c_str()[i]);
Serial.write(fullString.c_str()[i]);
}
delay(1000);
}
Code Breakdown
Here is a step-by-step explanation of the code:
Includes and Preprocessor Directives
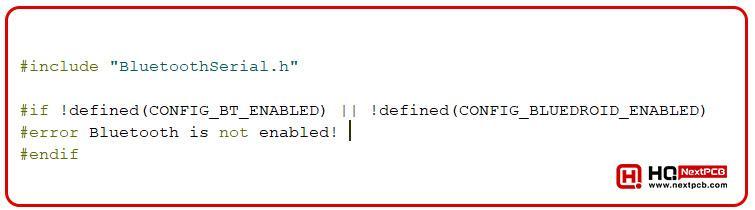
- #include "BluetoothSerial.h"`: This includes the BluetoothSerial library, which provides the necessary functions to use Bluetooth with the ESP32.
- The `#if` directive checks if Bluetooth is enabled in the configuration. If not, it throws a compile-time error, instructing the user to enable Bluetooth by running `make menuconfig`.
Pin Definitions and Variable Declarations

- `#define trigPin 2` and `#define echoPin 4`: These define the GPIO pins connected to the trig and echo pins of the ultrasonic sensor.
- `float duration`, and `float distance`: These variables store the pulse duration and calculated distance.
- `String fullString`: This string will hold the formatted distance message.
- `BluetoothSerial SerialBT`: An instance of the BluetoothSerial class for handling Bluetooth communication.
Setup Function
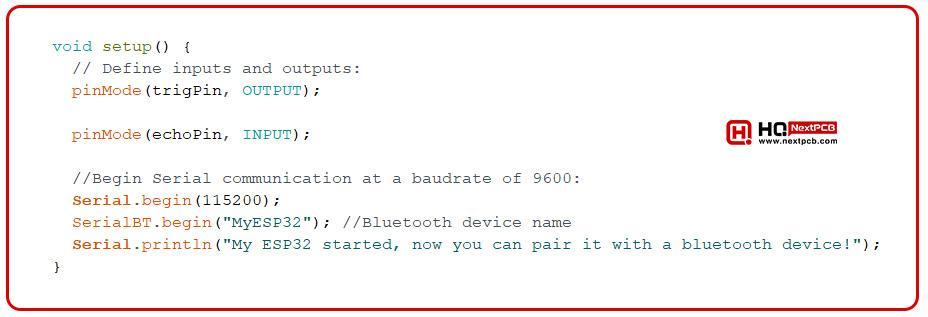
- `pinMode(trigPin, OUTPUT)` and `pinMode(echoPin, INPUT)`: Set the trig pin as an output and the echo pin as an input.
- `Serial.begin(115200)`: Initializes serial communication at a baud rate of 115200 for debugging.
- `SerialBT.begin("MyESP32")`: Initializes Bluetooth with the device name "MyESP32".
- `Serial.println("...")`: Outputs a message to the serial monitor indicating the device is ready for Bluetooth pairing.
Loop Function
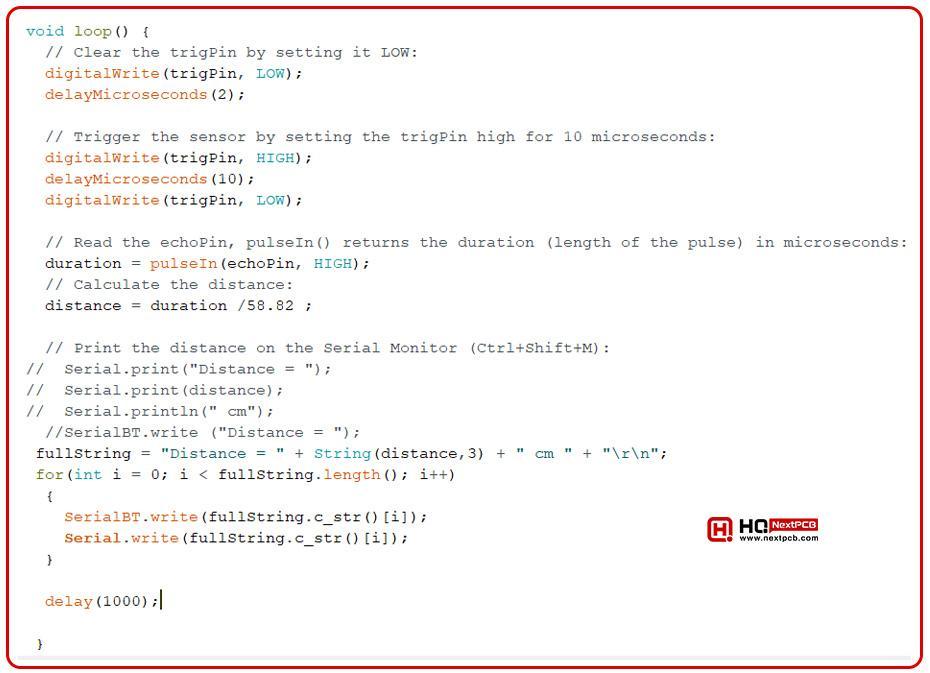
- `digitalWrite(trigPin, LOW)` and `delayMicroseconds(2)`: Clears the trig pin.
- `digitalWrite(trigPin, HIGH)`, `delayMicroseconds(10)`, `digitalWrite(trigPin, LOW)`: Sends a 10-microsecond pulse to trigger the ultrasonic sensor.
- `duration = pulseIn(echoPin, HIGH)`: Reads the echo pin and measures the duration of the pulse.
- `distance = duration / 58.82`: Calculates the distance based on the duration. The divisor 58.82 converts the time into distance (cm) assuming the speed of sound in air.
- The commented-out Serial. print lines show how you might print directly to the Serial Monitor, but they are not used in this code.
- `fullString = "Distance = " + String(distance, 3) + " cm " + "\r\n"`: Formats the distance measurement into a string with 3 decimal places.
- `for (int i = 0; i < fullString.length(); i++) { ... }`: Sends each character of `fullString` over Bluetooth and the serial monitor.
- `delay(1000)`: Waits for one second before repeating the loop.
Summary
This code uses an ultrasonic sensor to measure the distance of the nearest obstacle in front of the sensor itself. It sends the measurement over both Bluetooth and Serial communication. The setup initializes the necessary pins and communication interfaces. The loop triggers the sensor, reads the pulse duration, calculates the distance, formats the result into a string, and sends the string via Bluetooth and Serial.
Code uploading:
- Connect the ESP32 board with the USB cable to your computer.
- Select ESP32 from the board's list.
- Upload the above-written code to your ESP32.
- Open the serial monitor. Select 115200 baud rate.
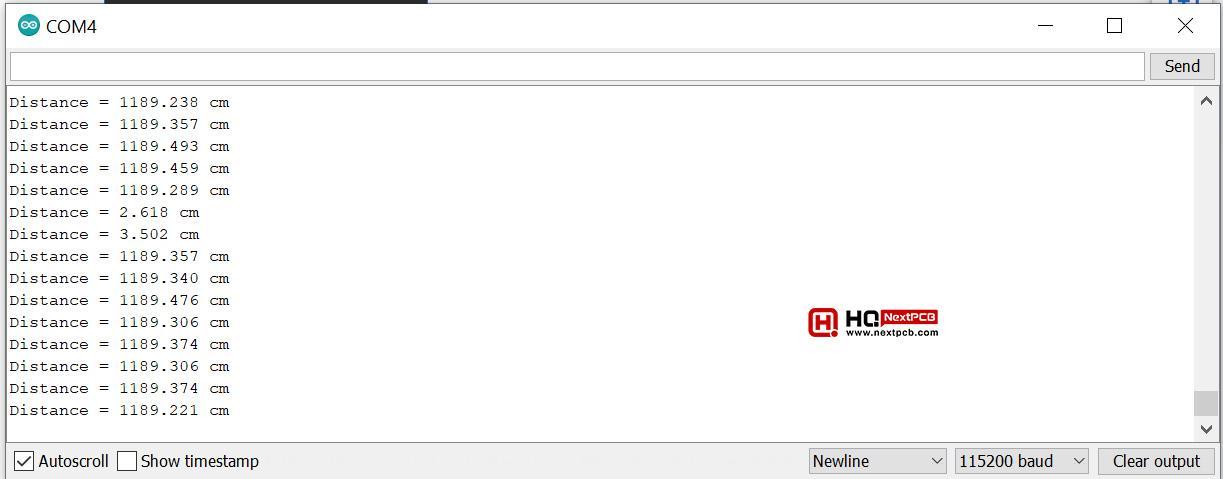
Fig: HCSR04 sensor output data in the serial monitor
Press the EN button on the ESP32.
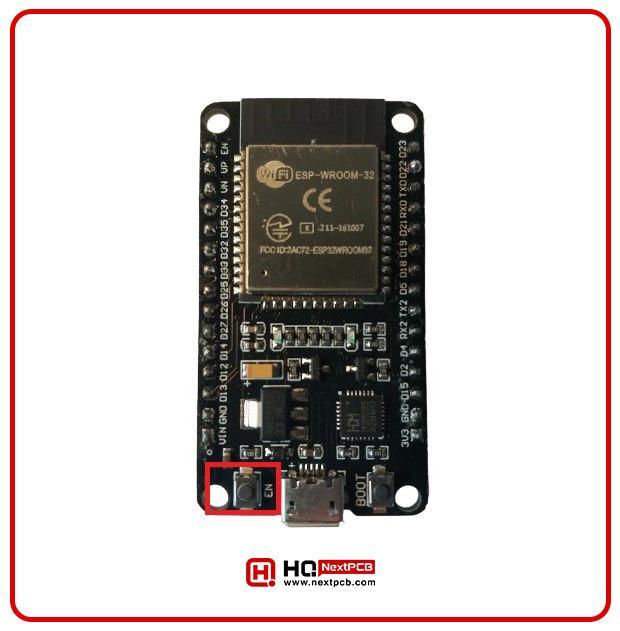
Fig: EN button of the ESP32-WROOM module
If everything goes well, you'll see this message in the serial monitor.
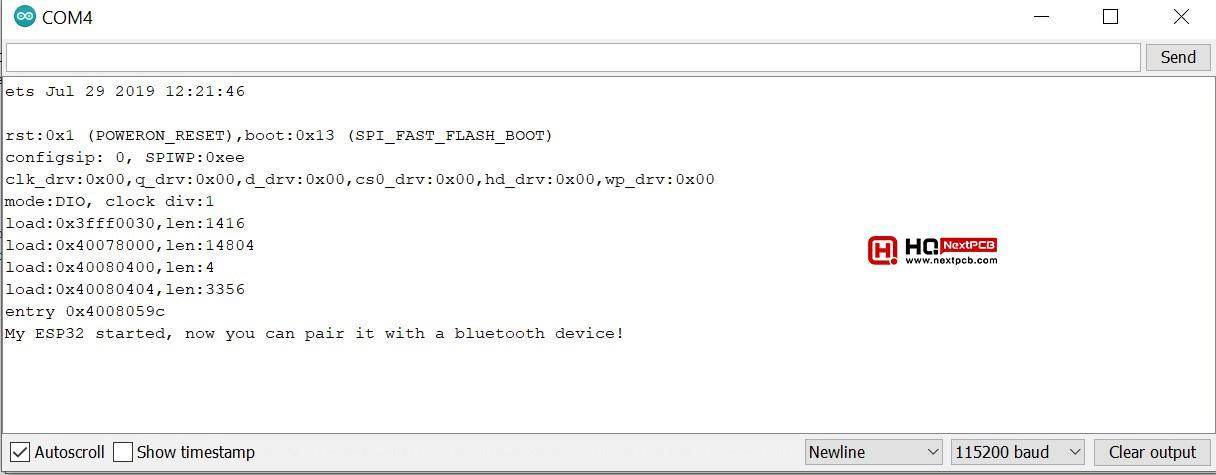
Fig: The ESP32 is ready for pairing
Pairing the ESP32 with your mobile phone:
- Turn on the Bluetooth scanner of your mobile phone.
- The ESP32 will appear in the list.
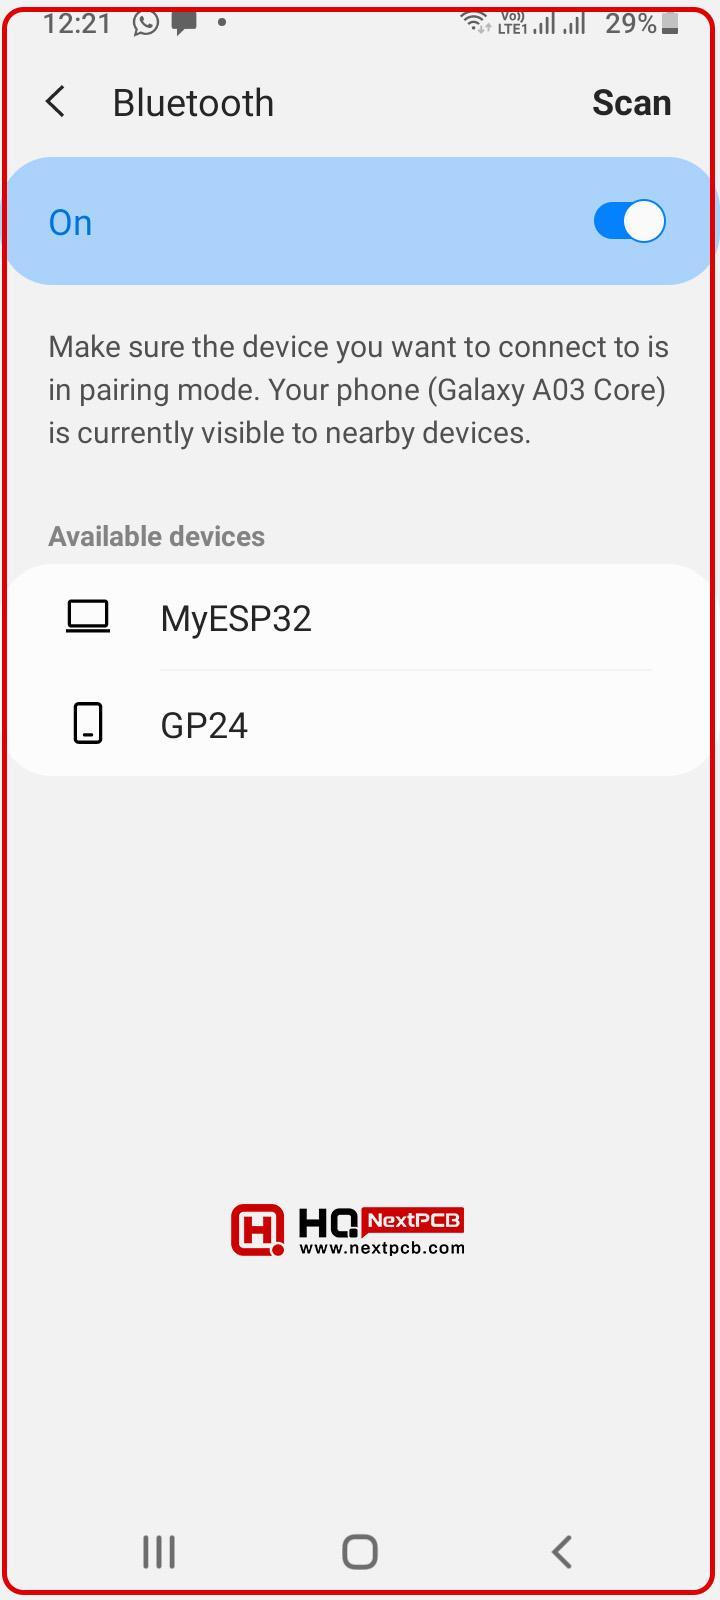
Fig: ESP32 detected by the mobile phone
- Pair it with your mobile phone.
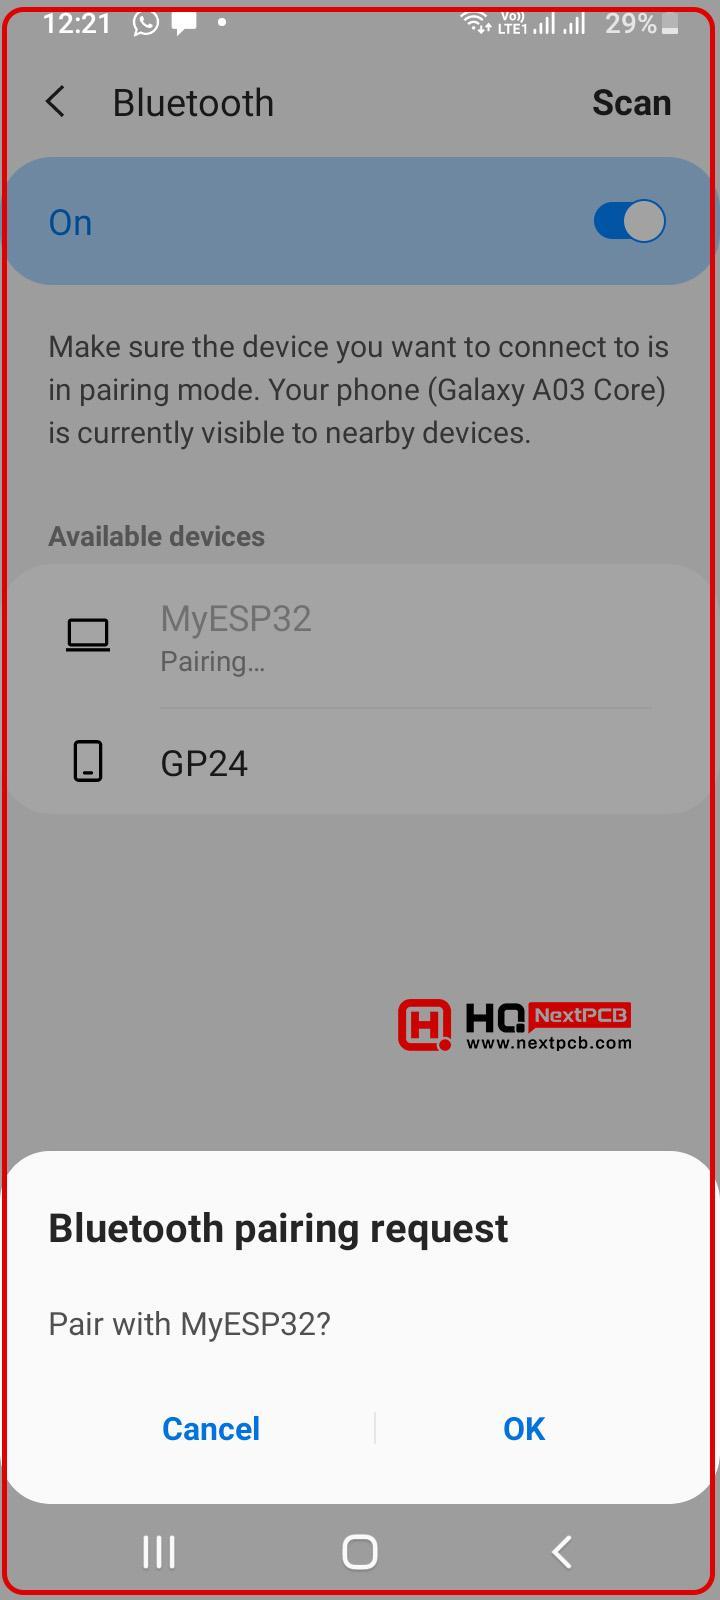
Fig: Pairing ESP32 with phone
App installation:
- To do this experiment, you have to install the Serial Bluetooth terminal app from the Google app store.
- Open the app. Go to devices. You will see the ESP32 in the device list. Click on the name.
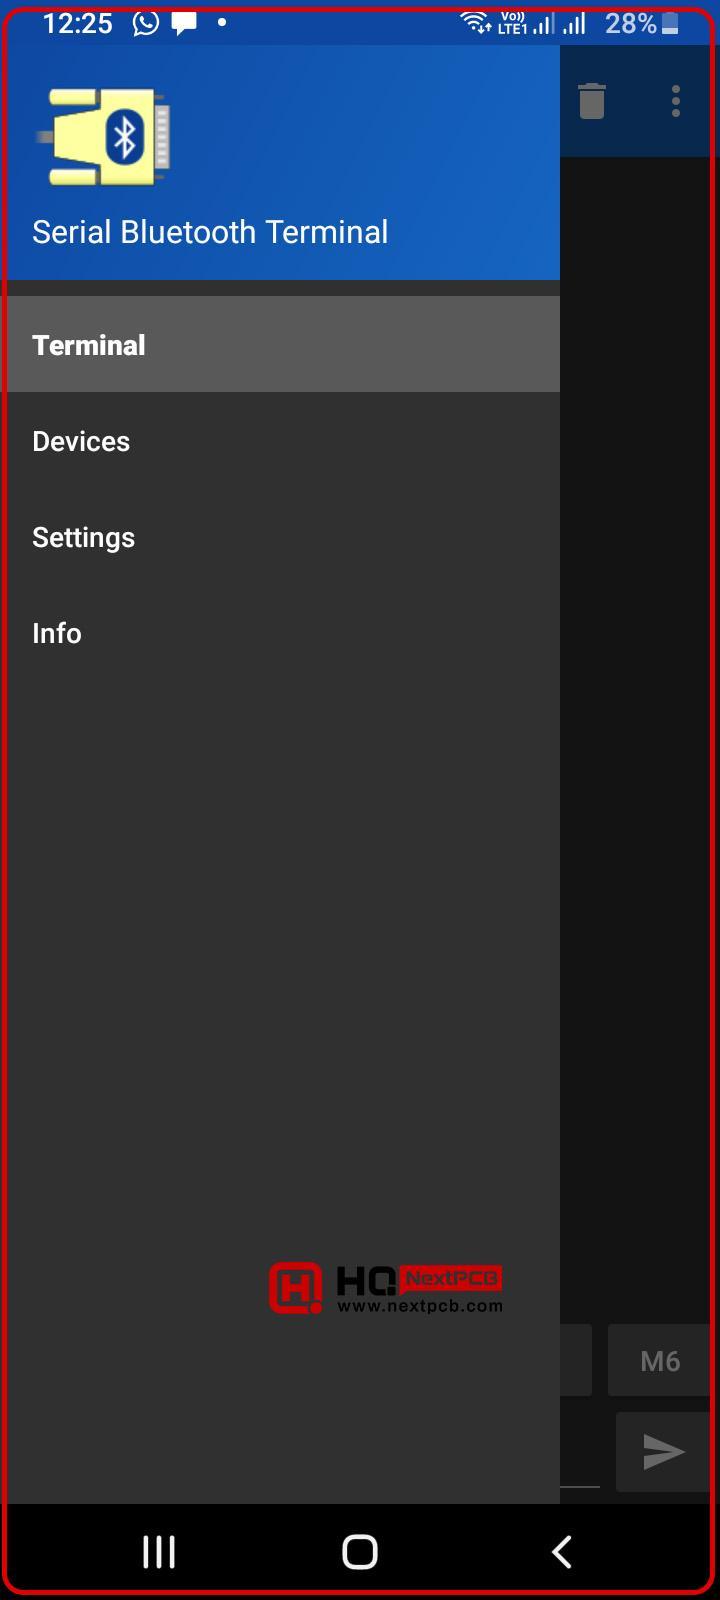
Fig: Menu of the serial Bluetooth terminal app

Fig: ESP32 detected by the app
- You can see the SONAR sensor data on your mobile phone.

Fig: SONAR sensor output data in mobile phone
What can we do further?
Here are some projects that utilize the ESP32's Bluetooth feature with a mobile phone:
- Bluetooth Controlled Home Automation:
- Use the ESP32 to control home appliances via Bluetooth using a mobile app. You can turn lights on/off, and control fans, and other devices.
- Bluetooth Temperature and Humidity Monitor:
- Use sensors connected to the ESP32 to monitor temperature and humidity. The data can be sent to a mobile app via Bluetooth, allowing for real-time monitoring.
- Bluetooth Smart Lock:
- Create a smart lock system where the ESP32 controls a lock mechanism. The lock can be unlocked using a mobile app via Bluetooth.
- Bluetooth-Based Health Monitoring System:
- Connect health sensors (like heart rate monitors) to the ESP32. Send the health data to a mobile app for monitoring and logging.
- Bluetooth Remote Control Car:
- Build a small RC car controlled via Bluetooth using a mobile app. The app can send commands to the ESP32 to control the car's movement.
These projects showcase the versatility of the ESP32's Bluetooth capabilities and how they can be used for various practical and fun applications
Comment