Hello. We Hope everything is fine at your side. How is the weather in your area? Well, it is quite easy to find out by yourself. Today we will see how to see the atmospheric temperature and humidity in a web server. We will use ESP32 and the DHT11 temperature and humidity sensor for this task.
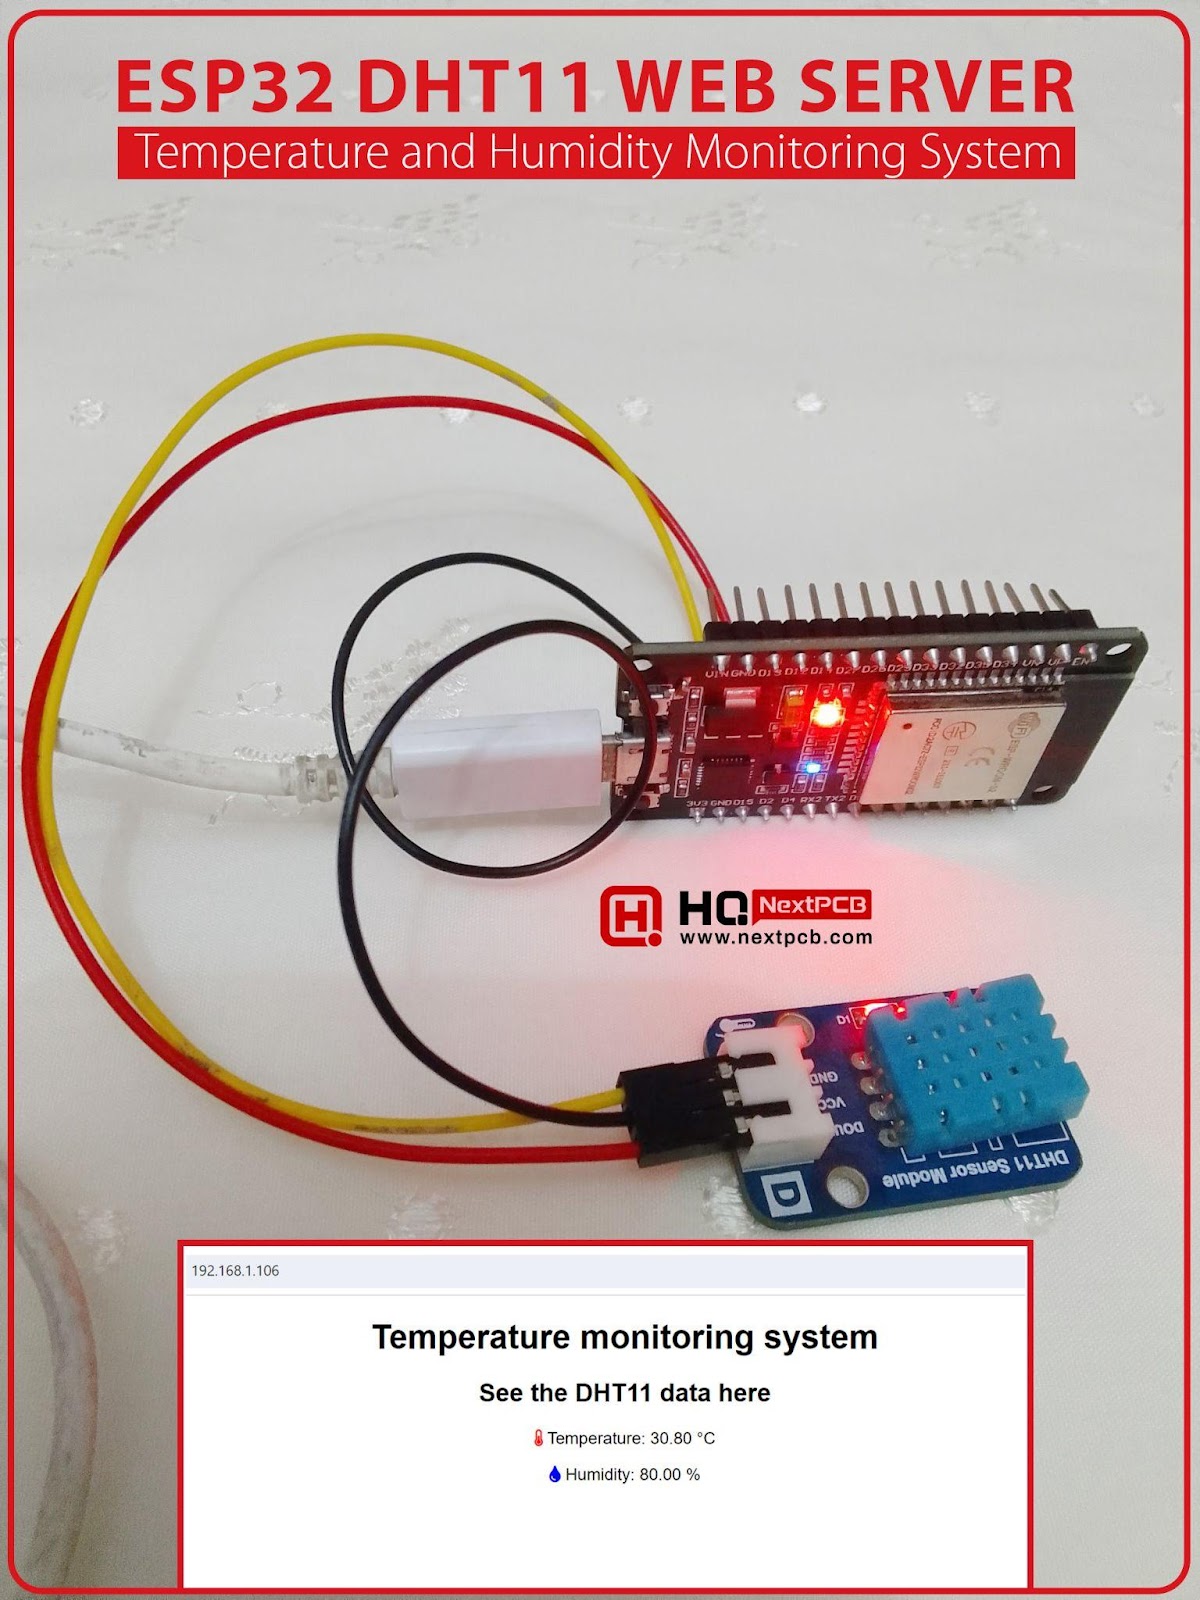
Fig: ESP32 and DHT11 connection
Project Description
We will connect the ESP32 and DHT11. For coding, we will use the Adafruit DHT library. We will create a web server and see the temperature and humidity there.
From this tutorial, we’ll know
- How to decipher DHT11 sensor output with ESP32
- How to create a web server
- How to update the temperature and humidity data in the web server
The DHT11 temperature and humidity sensor is a popular choice for various applications due to its accuracy, reliability, and ease of use. Here are some uses for the DHT11 sensor:
Home Automation Systems
This sensor can Monitor and control indoor temperature and humidity for comfort and energy efficiency. We can use DHT11 for temperature controllers and humidifiers.
Greenhouses
This sensor is largely used in greenhouse projects. With the help of this sensor, a microcontroller, and other relevant components, we can control temperature and humidity to optimize plant growth and health.
Weather Stations
You can make a weather station using this sensor. You can collect local environmental data for personal or educational purposes.
HVAC Systems
When used with other suitable components, this sensor can ensure heating, ventilation, and air conditioning systems maintain optimal indoor conditions.
Industrial Automation
Monitoring conditions in factories or warehouses to protect equipment and products.
Smart Agriculture
Managing environmental conditions in agricultural settings to improve crop yield and quality.
Data Centers
Monitoring conditions to prevent overheating and maintain equipment performance.
Health Monitoring Devices
Ensuring a controlled environment in medical facilities and personal health devices.
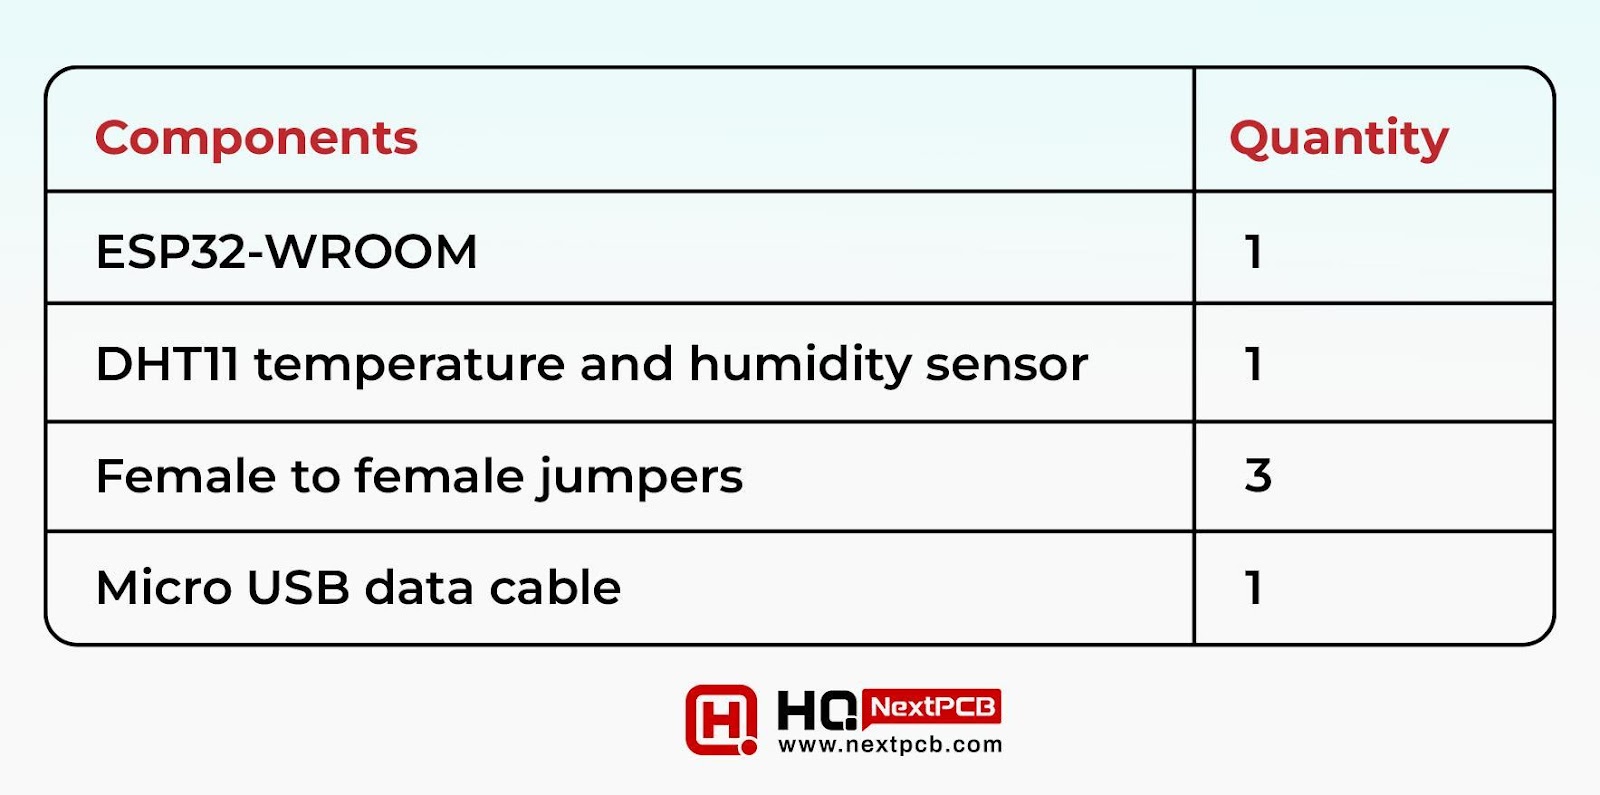
Components Required
Here is the list of components that we will use in this tutorial.
|
|
|
|
|
|
|
|
|
|
|
|
|
|
|
Circuit diagram
Following is the circuit diagram of our tutorial.
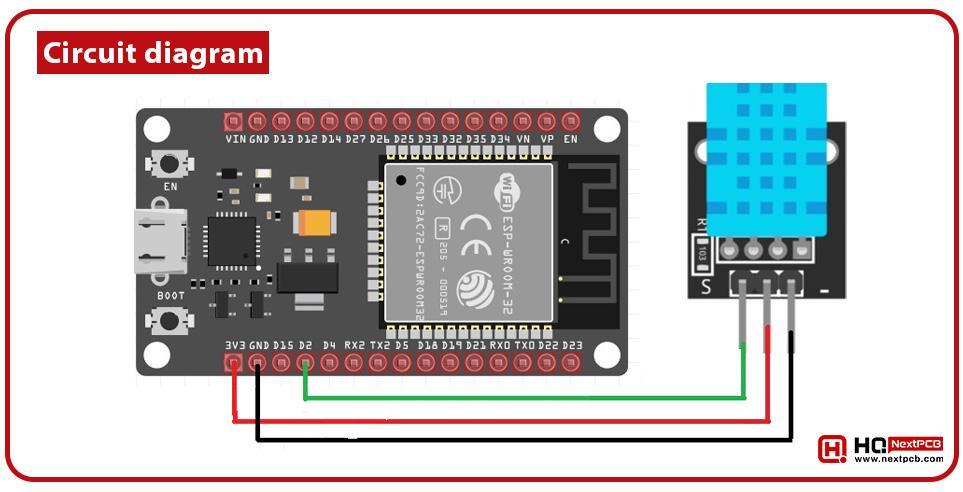
Fig: Connection between ESP32 and DHT11
Connection chart
The connections are shown in a chart for your convenience.
|
|
|
|
|
|
|
|
|
|
|
|
Programming:
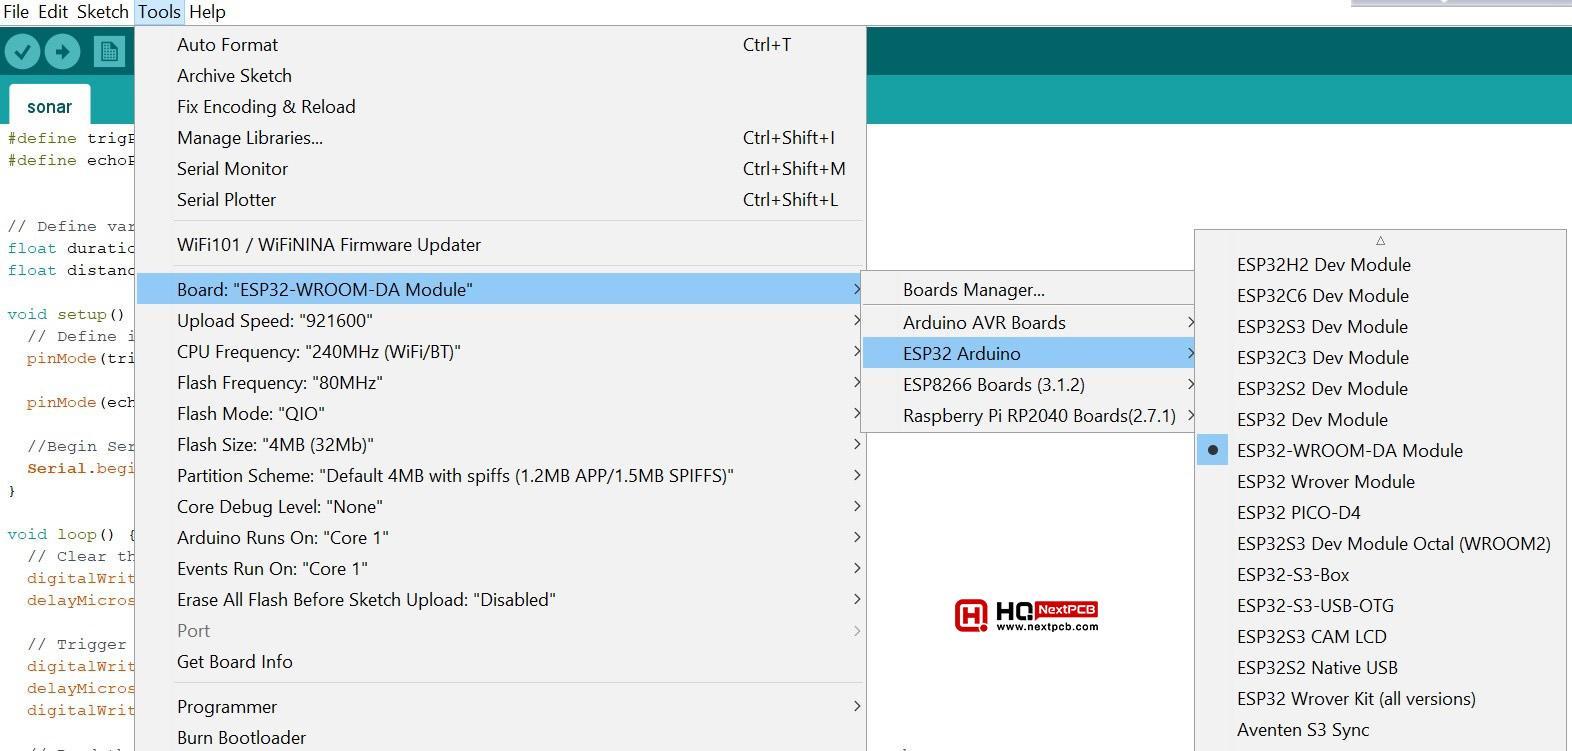
Board installation
If this is not your first project with the ESP32, feel free to skip the board installation steps. Otherwise, you need to install the board first.
Go to File> preferences, type https://dl.espressif.com/dl/package_esp32_index.json, and hit OK.

Go to ‘Boards Manager’ and install the ESP32 boards.
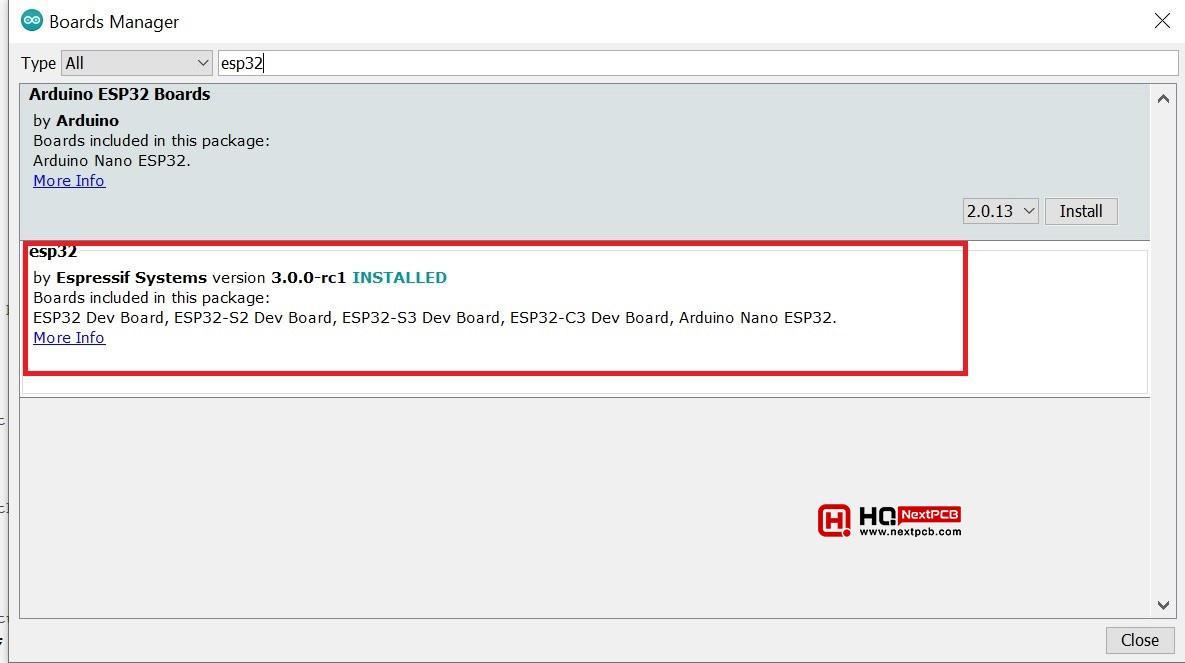
All ESP32 boards will be shown in the ‘boards’ list. Choose the right one according to the version you’re using. In our case, it was ESP32-WROOM.
Driver Installation
You need the CP210x driver to use the ESP32-WROOM board. You can download it from here.
Code
#include "DHT.h"
#include <WiFi.h>
#define DHTPIN 2
#define DHTTYPE DHT11
DHT dht(DHTPIN, DHTTYPE);
const char* ssid = "Your SSID ";
const char* password = "Your wifi password";
WiFiServer server(80);
// Variable to store the HTTP request
String header;
// Assign output variables to GPIO pins
const int sensorPin = 2;
// Current time
unsigned long currentTime = millis();
// Previous time
unsigned long previousTime = 0;
const long timeoutTime = 2000;
void setup() {
dht.begin();
pinMode(sensorPin, INPUT);
Serial.begin(9600);
Serial.println(F("DHTxx test!"));
// Connect to Wi-Fi network with your SSID and password
Serial.print("Connecting to ");
Serial.println(ssid);
WiFi.begin(ssid, password);
while (WiFi.status() != WL_CONNECTED) {
delay(500);
Serial.print(".");
}
Serial.println("");
Serial.println("WiFi connected.");
Serial.println("IP address: ");
Serial.println(WiFi.localIP());
server.begin();
}
void loop() {
// Wait a few seconds between measurements.
delay(2000);
float h = dht.readHumidity();
float t = dht.readTemperature();
float f = dht.readTemperature(true);
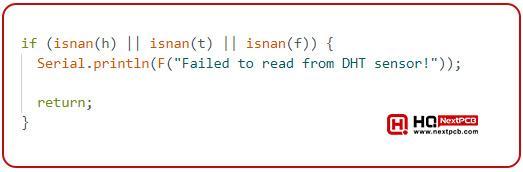
if (isnan(f) || isnan(t) || isnan(h)) {
Serial.println(F("Failed to read from DHT sensor!"));
return;
}
float hif = dht.computeHeatIndex(f, h);
float hic = dht.computeHeatIndex(t, h, false);
Serial.print(F("Humidity: "));
Serial.print(h);
Serial.print(F("% Temperature: "));
Serial.print(t);
Serial.print(F("°C "));
Serial.print(f);
Serial.print(F("°F Heat index: "));
Serial.print(hic);
Serial.print(F("°C "));
Serial.print(hif);
Serial.println(F("°F"));
Serial.println(WiFi.localIP());
WiFiClient client = server.available();
if (client) {
currentTime = millis();
previousTime = currentTime;
Serial.println("New Client.");
String currentLine = "";
while (client.connected() && currentTime - previousTime <= timeoutTime) {
currentTime = millis();
if (client.available()) {
char c = client.read();
Serial.write(c);
header += c;
if (c == '\n') {
if (currentLine.length() == 0) {
client.println("HTTP/1.1 200 OK");
client.println("Content-type:text/html; charset=UTF-8");
client.println("Connection: close");
client.println();
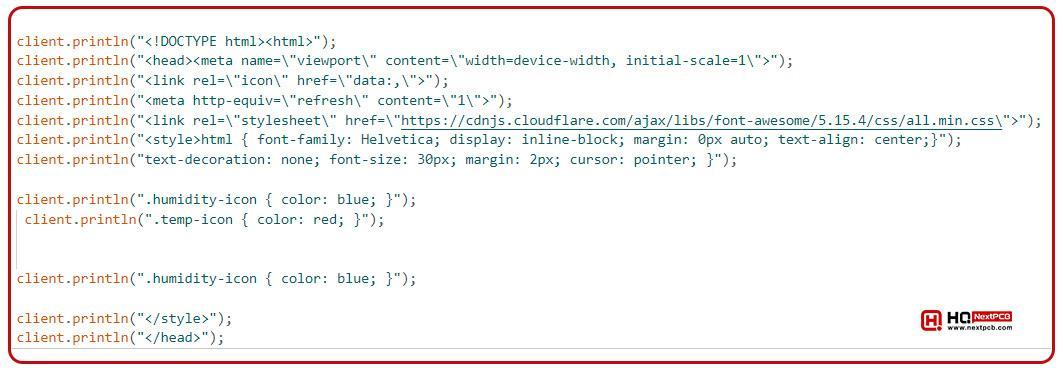
client.println("<!DOCTYPE html><html>");
client.println("<head><meta name=\"viewport\" content=\"width=device-width, initial-scale=1\">");
client.println("<link rel=\"icon\" href=\"data:,\">");
client.println("<meta http-equiv=\"refresh\" content=\"1\">");
client.println("<link rel=\"stylesheet\" href=\"https://cdnjs.cloudflare.com/ajax/libs/font-awesome/5.15.4/css/all.min.css\">");
client.println("<style>html { font-family: Helvetica; display: inline-block; margin: 0px auto; text-align: center;}");
client.println("text-decoration: none; font-size: 30px; margin: 2px; cursor: pointer; }");
client.println(".humidity-icon { color: blue; }");
client.println(".temp-icon { color: red; }");
client.println(".humidity-icon { color: blue; }");
client.println("</style>");
client.println("</head>");
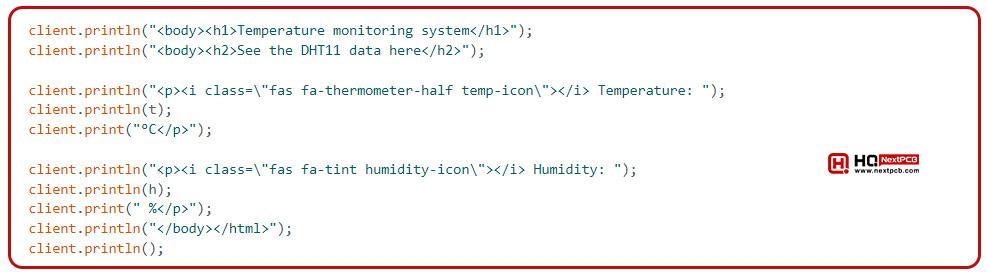
client.println("<body><h1>Temperature monitoring system</h1>");
client.println("<body><h2>See the DHT11 data here</h2>");
client.println("<p><i class=\"fas fa-thermometer-half temp-icon\"></i> Temperature: ");
client.println(t);
client.print("°C</p>");
client.println("<p><i class=\"fas fa-tint humidity-icon\"></i> Humidity: ");
client.println(h);
client.print(" %</p>");
client.println("</body></html>");
client.println();
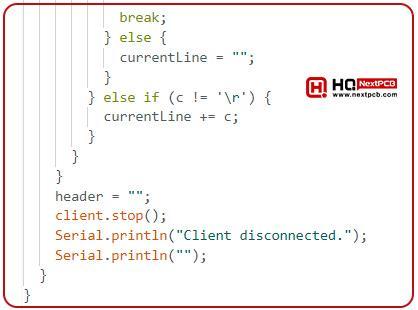
break;
} else {
currentLine = "";
}
} else if (c != '\r') {
currentLine += c;
}
}
}
header = "";
client.stop();
Serial.println("Client disconnected.");
Serial.println("");
}
}
Code Explanation
Here is a detailed line-by-line breakdown of the code, including the CSS parts.
Header Files

- `#include "DHT.h"`: Includes the library for interacting with the DHT sensor.
- `#include <WiFi.h>`: Includes the library for handling Wi-Fi connectivity on the ESP32 or similar microcontroller.
- `#define DHTPIN 2`: Defines the digital pin number (2) where the DHT sensor is connected.
- `#define DHTTYPE DHT11`: Defines the type of DHT sensor being used, which is DHT11 in this case.
DHT Sensor Initialization

- Initializes the DHT sensor with the defined pin (`DHTPIN`) and sensor type (`DHTTYPE`).
Wi-Fi Credentials

- Stores the Wi-Fi network's SSID and password in string constants for connecting to the network.
Server Initialization

- Initializes a web server on port 80, which is the default port for HTTP.
Variable Declarations
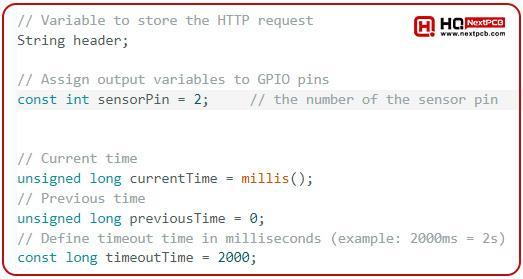
- `String header`: Used to store the HTTP request header.
- `const int sensorPin = 2`: Defines the PIN connected to the sensor (repeating the `DHTPIN` definition, not strictly necessary).
- `unsigned long currentTime = millis()`: Stores the current time in milliseconds since the program started.
- `unsigned long previousTime = 0`: Stores the previous time in milliseconds, used for timing client connections.
- `const long timeoutTime = 2000`: Defines the timeout duration (2000 milliseconds or 2 seconds) for client connections.
Setup Function

- `dht.begin()`: Initializes the DHT sensor.
- `pinMode(sensorPin, INPUT)`: Sets the sensor pin as an input.
- `Serial.begin(9600)`: serial communication speed is set to 9600 BPS.
- `Serial.println(F("DHTxx test!"))`: Prints "DHTxx test!" to the serial monitor.
- `Serial.print("Connecting to "); Serial.println(ssid)`: Prints the SSID of the Wi-Fi network to the serial monitor.
- `WiFi.begin(ssid, password)`: Starts the process of connecting to the Wi-Fi network with the provided SSID and password.
- `while (WiFi.status() != WL_CONNECTED) { delay(500); Serial.print("."); }`: Waits in a loop, printing a dot every 500 milliseconds until the Wi-Fi connection is established.
- `Serial.println(""); Serial.println("WiFi connected."); Serial.println("IP address: "); Serial.println(WiFi.localIP())`: Prints the message "WiFi connected." followed by the local IP address assigned to the ESP32.
- `server.begin()`: Starts the web server.
Main Loop Function
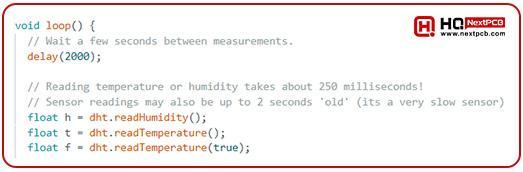
- `delay(2000)`: Waits for 2 seconds between measurements to avoid flooding the sensor with read requests.
- `float h = dht.readHumidity()`: Reads the humidity from the DHT sensor and stores it in `h`.
- `float t = dht.readTemperature()`: Reads the temperature in Celsius from the DHT sensor and stores it in `t`.
- `float f = dht.readTemperature(true)`: Reads the temperature in Fahrenheit from the DHT sensor and stores it in `f`.
- `if (isnan(f) || isnan(t) || isnan(h)) { Serial.println(F("Failed to read from DHT sensor!")); return; }`: NaN means Not a number. This indicates unrealistic data. This part of the code Checks if any of the sensor readings are NaN. NaN value occurs due to no connection, wrong connection or a faulty sensor.

- `float hif = dht.computeHeatIndex(f, h)`: Computes the heat index in Fahrenheit based on the temperature and humidity.
- `float hic = dht.computeHeatIndex(t, h, false)`: Computes the heat index in Celsius .
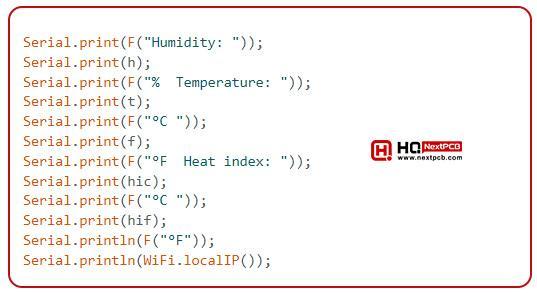
- Prints the sensor data to the serial monitor in a readable format, including humidity, the temperature in Celsius and Fahrenheit, and the heat index in both units.

- `WiFiClient client = server.available()`: Returns a client object if a client has connected to the web server.
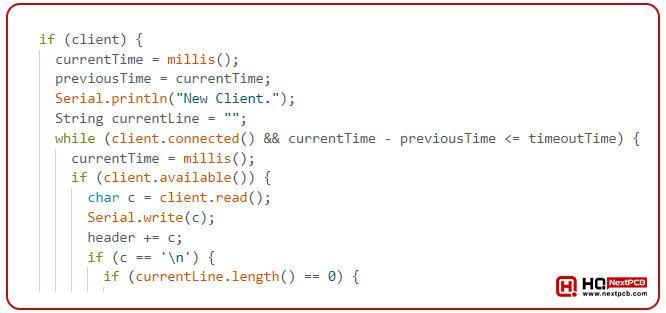
- `if (client)`: Checks if a client is connected.
- `currentTime = millis(); previousTime = currentTime`: Updates the current and previous time for connection timeout management.
- `Serial.println("New Client.");`: Prints a message indicating a new client connection.
- `String currentLine = "";`: Initializes a string to store the current line of the HTTP request.
- `while (client.connected() && currentTime - previousTime <= timeoutTime)`: Keeps the connection open while the client is connected and the timeout has not been reached.
- `currentTime = millis();`: Updates the current time.
- `if (client.available())`: Checks if data is available to read from the client.
- `char c = client.read();`: Reads a character from the client.
- `Serial.write(c);`: Writes the character to the serial monitor.
- `header += c;`: Adds the character to the HTTP request header string.
- `if (c == '\n') { if (currentLine.length() == 0)`: Checks if the character is a newline and if the current line is empty, indicating the end of the HTTP request headers.
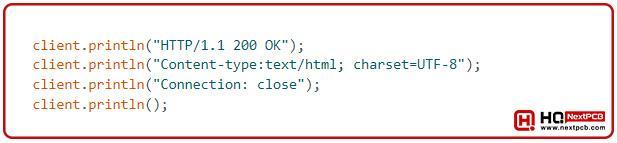
- `client.println("HTTP/1.1 200 OK");`: The line sends an HTTP response that confirms a successful request with a 200 OK status code.
- `client.println("Content-type:text/html; charset=UTF-8");`: Specifies the content type of the response as HTML with UTF-8 character encoding.
- `client.println("Connection: close");`: Indicates that the connection will be closed after the response is sent.
- `client.println();`: Sends a blank line to separate the headers from the body of the response.
- `client.println("<!DOCTYPE html><html>");`: Starts the HTML document.
- `client.println("<head><meta name=\"viewport\" content=\"width=device-width, initial-scale=1\">");`: Sets the viewport meta tag for responsive design.
- `client.println("<link rel=\"icon\" href=\"data:,\">");`: Adds a blank favicon to prevent a 404 error.
- `client.println("<meta http-equiv=\"refresh\" content=\"1\">");`: Adds a meta tag to refresh the page every second.
- `client.println("<link rel=\"stylesheet\" href=\"https://cdnjs.cloudflare.com/ajax/libs/font-awesome/5.15.4/css/all.min.css\">");`: Includes the Font Awesome stylesheet for icons.
- `client.println("<style>html { font-family: Helvetica; display: inline-block; margin: 0px auto; text-align: center;}");`: Adds an inline CSS style block with styling rules:
- `font-family: Helvetica;`: Sets the font family to Helvetica.
- `display: inline-block;`: Displays elements as inline blocks.
- `margin: 0px auto;`: Centers the content horizontally.
- `text-align: center;`: Centers the text.
- `client.println("text-decoration: none; font-size: 30px; margin: 2px; cursor: pointer; }");`: Adds further CSS rules:
- `text-decoration: none;`: Removes text decoration (e.g., underlines).
- `font-size: 30px;`: Sets the font size to 30 pixels.
- `margin: 2px;`: Sets a margin of 2 pixels.
- `cursor: pointer;`: Changes the cursor to a pointer when hovering over elements.
- `client.println(".humidity-icon { color: blue; }");`: Adds a CSS rule for the humidity icon class, setting the color to blue.
- `client.println(".temp-icon { color: red; }");`: Adds a CSS rule for the temperature icon class, setting the color to red.
- `client.println("</style>");`: Closes the style block.
- `client.println("</head>");`: Closes the head section of the HTML document.
- `client.println("<body><h1>Temperature monitoring system</h1>");`: Starts the body section of the HTML document and adds a heading with the text "Temperature monitoring system".
- `client.println("<body><h2>See the DHT11 data here</h2>");`: Adds a subheading with the text "See the DHT11 data here".
- `client.println("<p><i class=\"fas fa-thermometer-half temp-icon\"></i> Temperature: ");`: Adds a paragraph with a Font Awesome thermometer icon and the text "Temperature: ".
- `client.println(t); client.print("°C</p>");`: Inserts the temperature value and the unit "°C", then closes the paragraph tag.
- `client.println("<p><i class=\"fas fa-tint humidity-icon\"></i> Humidity: ");`: Adds another paragraph with a Font Awesome humidity icon and the text "Humidity: ".
- `client.println(h); client.print(" %</p>");`: Inserts the humidity value and the unit "%", then closes the paragraph tag.
- `client.println("</body></html>");`: Closes the body and HTML tags, ending the document.
- `client.println();`: Sends a blank line to complete the HTTP response.
- `break;`: Breaks out of the while loop after sending the response.
- `else { currentLine = ""; }`: Resets the `currentLine` string if the newline character is encountered and the line is not empty.
- `else if (c != '\r') { currentLine += c; }`: Adds the character to `currentLine` if it is not a carriage return.
- `header = "";`: Clears the header string for the next client request.
- `client.stop();`: Closes the connection with the client.
- `Serial.println("Client disconnected.");`: Prints a message indicating the client has disconnected.
- `Serial.println("");`: Prints a blank line for readability in the serial monitor output.
Testing
Here’s the hardware setup of our project i.e. ESP32 with DHT11:
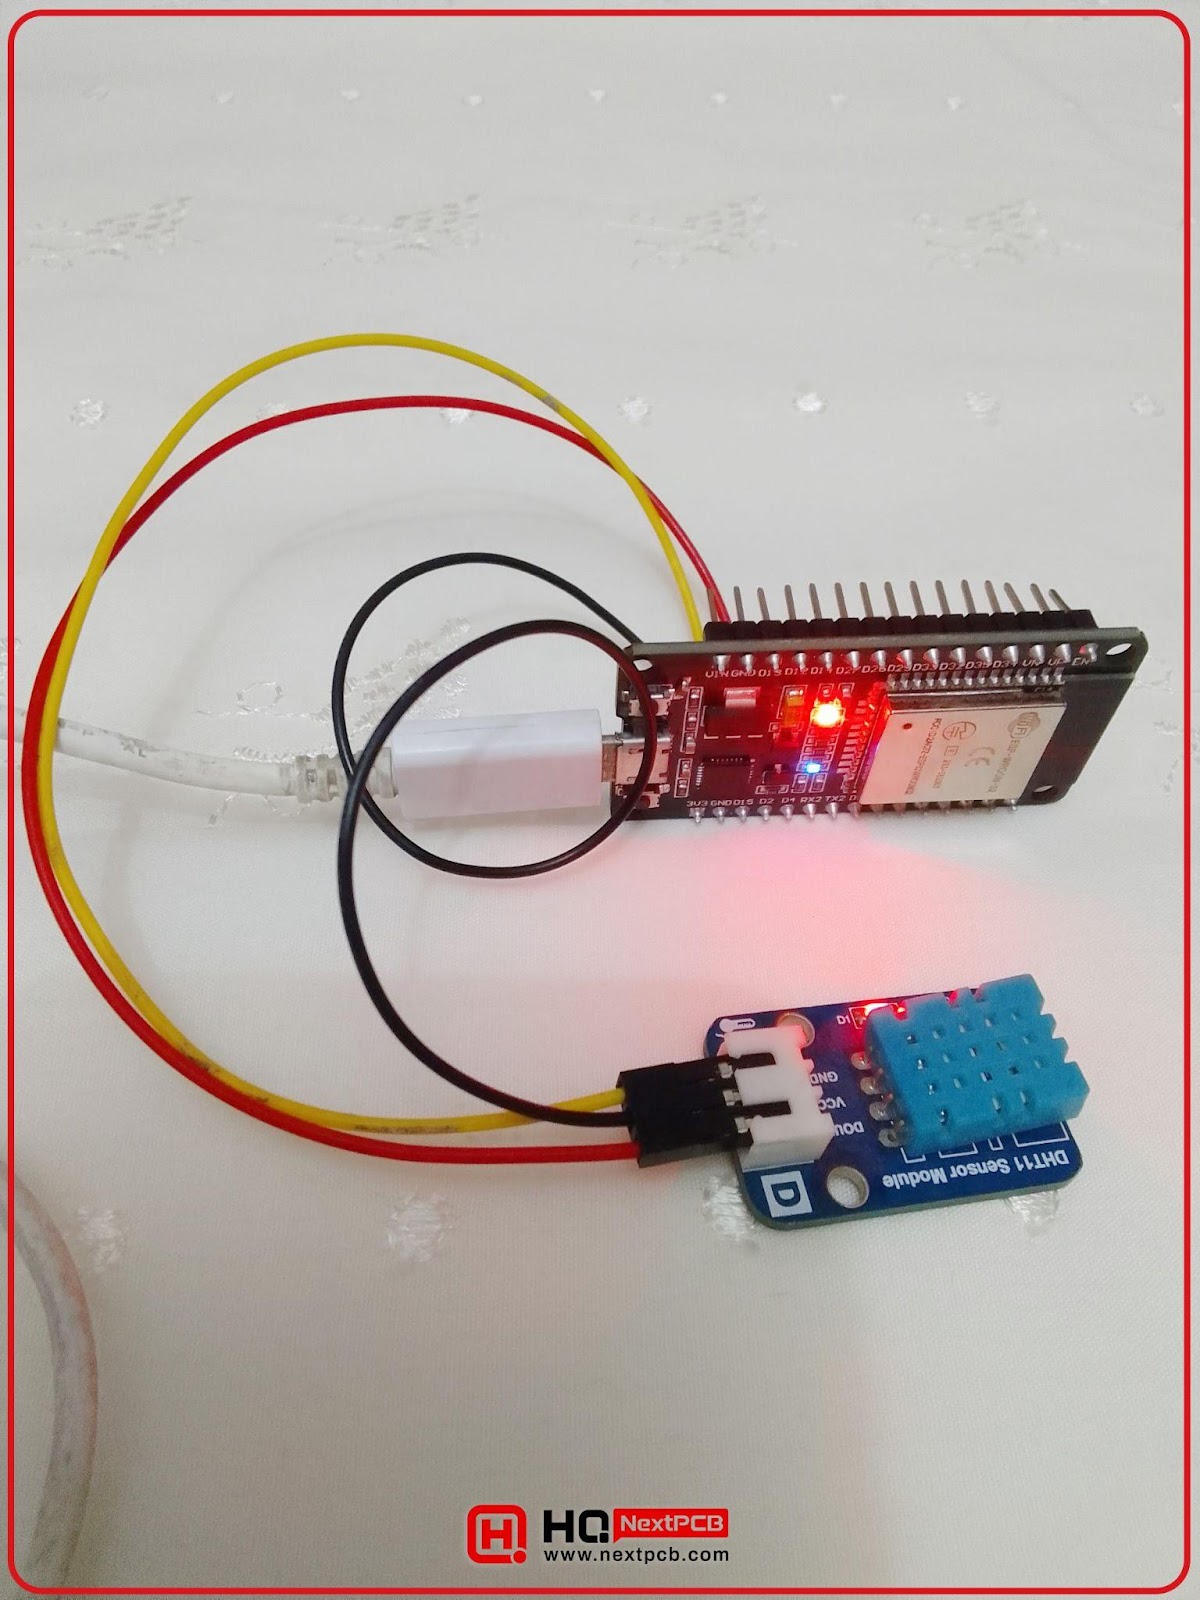
Fig: ESP32 & DHT11 Hardware Setup
After uploading the code to the ESP32, you’ll see the IP address of the device in the serial monitor. Copy-paste the address in the web browser. You’ll see the temperature and humidity.
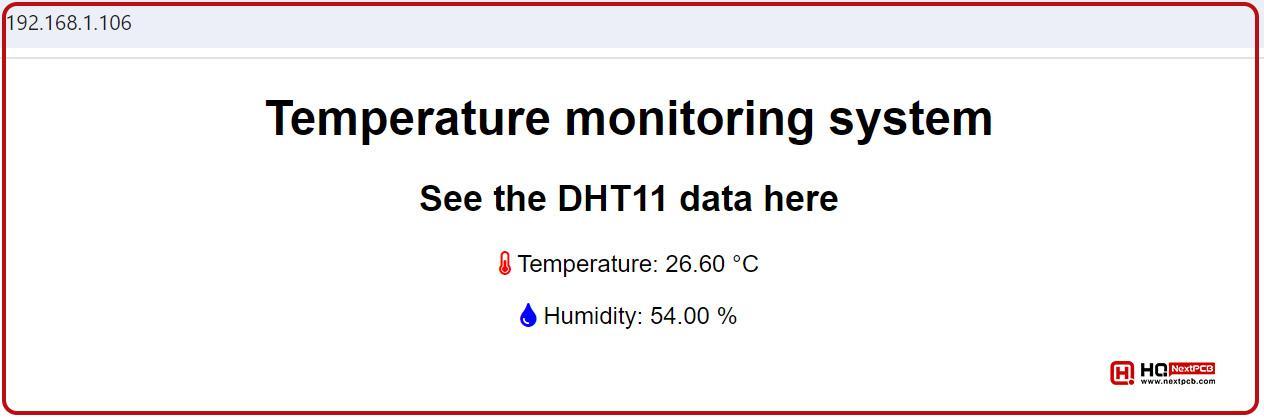
Fig: Data in an air-conditioned room
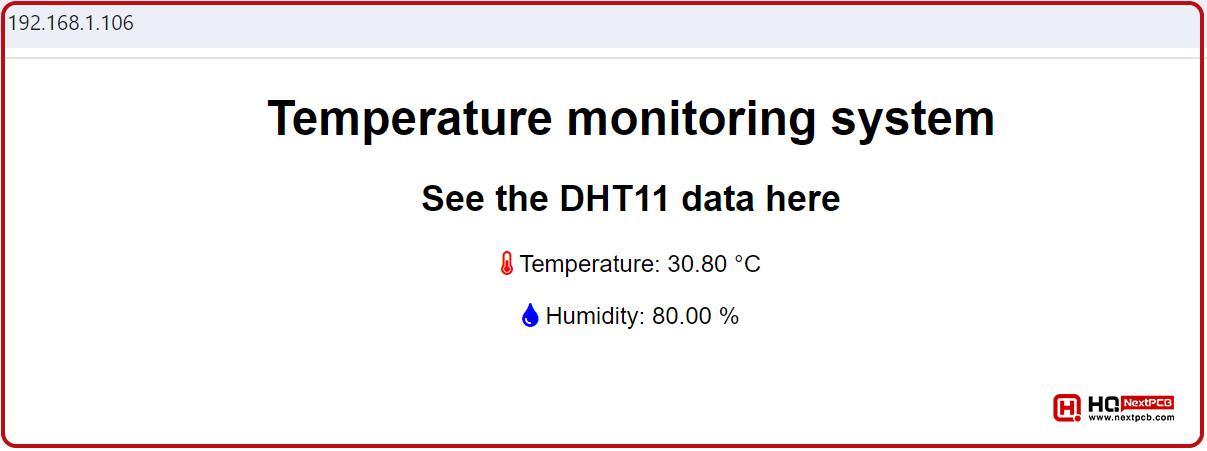
Fig: Data when the AC was off
So, that’s all for today. We hope you all can do this project without any problem.
Comment